Help with WordPress
WPVivid Backup
What We'll Learn
- Why Backups Are so !Important
- Creating Manual Backups
- Scheduling Backups
- Restoring Backups
Starting Point: WordPress Admin Dashboard >> WPVivid Backup
Why Backups Are so !Important
Backups are an easy way to keep multiple versions of your site. Before making big changes to your site, or if you’re updating your WordPress version, plugins, or themes, then you should always have an up-to-date copy of your site saved. Most hosting companies will offer free daily or weekly backups with their plans. However, using a plugin can put more control in your hands and allow you to more easily protect your site.
Creating Manual Backups
To create your first backup, head to WPVivid Backup (near the bottom of the admin bar), then Backup & Restore. By default, backups will be saved to your website’s local directory. This means that it will take up storage space on your hosting account, so be aware of storage limitations with your plan. Click the Backup Now button to begin the backup process.

You can also download backups to your computer as a .zip file. At the bottom of the page, you can see all of your backups. Next to each one is a Download button, which will save it to your computer. This is important to do when updating your WordPress version, in case you can’t reach your admin dashboard and need a professional to step in. Simply send them the .zip file and ask that they restore your website.

Scheduling Backups
Before updating your wp version, it’s important to back-up your website. You never know what could happen after you update, so you should always have an extra version of your site lying around just in case. The same can also be said if you’re updating plugins en mas, or manually updating your PHP version. A lof of hosting companies nowadays offer backups with their plans- however, if you’re unable to access them or simply don’t have them enabled, don’t sweat it. There are a number of free backup plugins available, with my favourite being WPVivid Backup.

Restoring Backups
All of your backups will appear at the bottom of the Backup & Restore tab. You can easily restore an older version of your site by clicking Restore next to any backup. It’s good to regularly backup your site, and manually before every WP core update or if you’re updating a lot of plugins at once. Remember that any changes that were made in-between backups could potentially be lost. For example, restoring a backup from a month ago means that any changes made in the meantime will be lost. Regularly backing up your site ensures that they’re as up to date as possible.
Website Maintenance
What We'll Learn
- Some Steps Beforehand
- The Risks Involved
- The Importance of Staying Up to Date
- Backing Up Your Site
- Doing Some Maintenance
- How to Update Your WordPress Version
- Updating Plugins
- Removing Inactive Plugins
- Checking the Status of Your Site
- Post-Maintenance Checks
- Staying Up to Date in the Future
Starting Point: WordPress Admin Dashboard
Some Steps Beforehand
The Risks Involved
I tend to be all about teaching clients how to be their own DIY web designers. However, there’s always a level of risk involved when you try to do a professional job yourself. And when it comes to website maintenance, there can be several concerns to be aware of. If you’re not comfortable with these risks, then you should look at contacting a professional to make the updates for you. Their prices usually range from $75 onwards.
The Importance of Staying Up to Date
“All of these articles say I should update my wp version, but I don’t understand why. What’s the benefit?” There are many benefits to keeping your wp version up to date, which usually come in the form of performance and security boosts. The wp team is always working towards making the software more secure, so every major update will come with more advancements in keeping your site safe. For even more security, you can consider using a service like CloudFlare. This will require a bit of knowledge to set up, but their basic plans are completely free!
Backing Up Your Site
Before updating your wp version, it’s important to back-up your website. You never know what could happen after you update, so you should always have an extra version of your site lying around just in case. A lot of hosting companies nowadays offer backups with their plans. However, there are also several free backup plugins available, with my favourite being WPVivid Backup (check out our article on how to use it!). To make your own backups with this plugin, you can visit my article on it. Backups from your hosts can usually be retrieved regardless of what condition the site is in, though this isn’t always true for plugin-based backups. If you can’t reach your admin dashboard, then there’s no way to use WPVivid Backup and restore your site. That’s why it’s good practice to either download a copy to your computer or keep them in something like a Google Drive account. In the case that you need assistance from a professional, this will make it easier for them to restore your site. Simply give them the .zip file you downloaded or send them a sharing link for your Google Drive location.
Making Updates & Cleaning up your Site
Checking for Updates
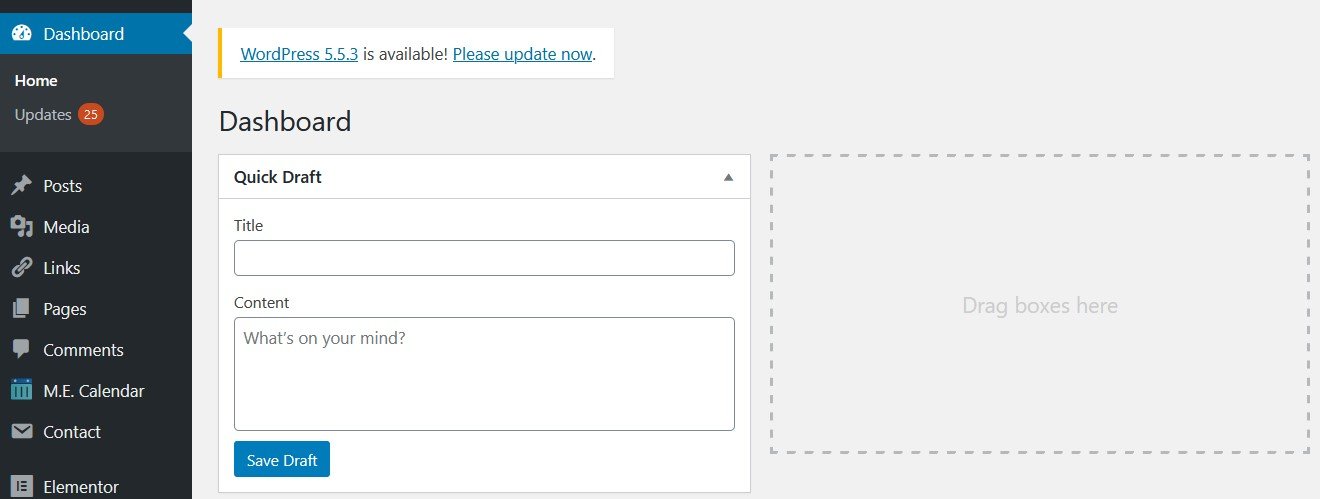
The first place to check is your site tools. Head to Tools >> Site Tools and see if any updates are available for plugins, themes, or WordPress core. This will also give you insights on any security risks for your site. You can check for all of these updates manually: first, by going to Appearance >> Themes, then Plugins >> Installed Plugins, lastly you can check for WordPress core updates by looking for an update message at the top of any page. It should read “WordPress ___ is available! Please update now.”
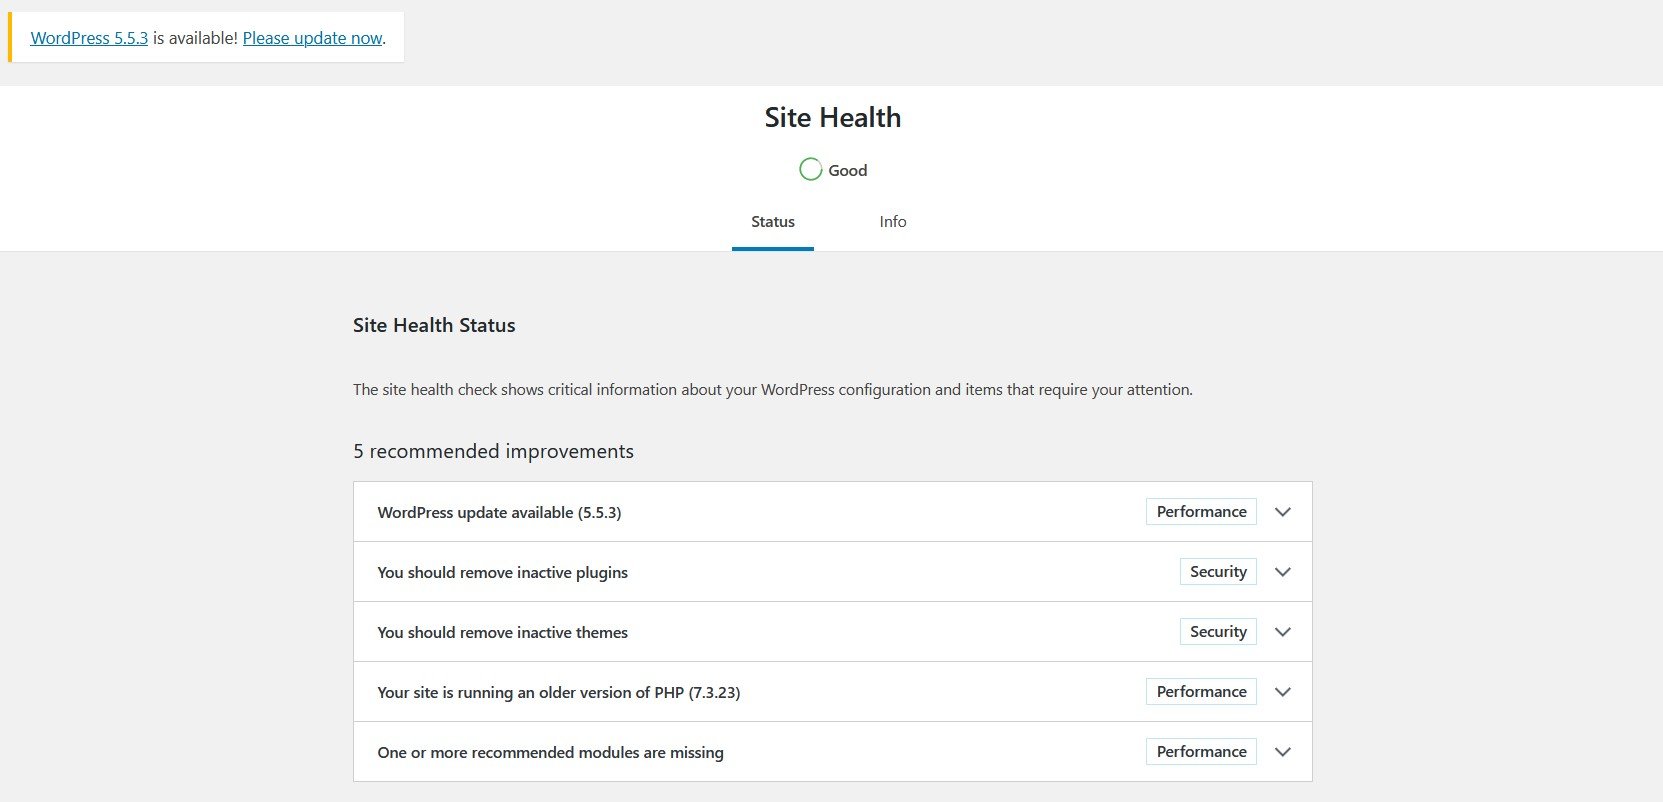
Before beginning, go to the Info section in Site Health. Check out the different tabs to learn more about your site. Use the WordPress tab to see which version of WordPress core you’re currently using. Click “Copy site info to clipboard” to obtain all sorts of useful infro about your site. This should be kept somewhere safe for the duration of the maintenance process, as it can be very useful when troubleshooting problems.
Updating Your WordPress Version
Now that you’ve got your backup made, it’s finally time to update. Head into your admin dashboard >> home. There should be a message at the top of the page saying, “WordPress ___ is available! Please update now.” Click the update text, then the update button on the following page. Once the process is finished, your site will be all up to date!
Updating Plugins
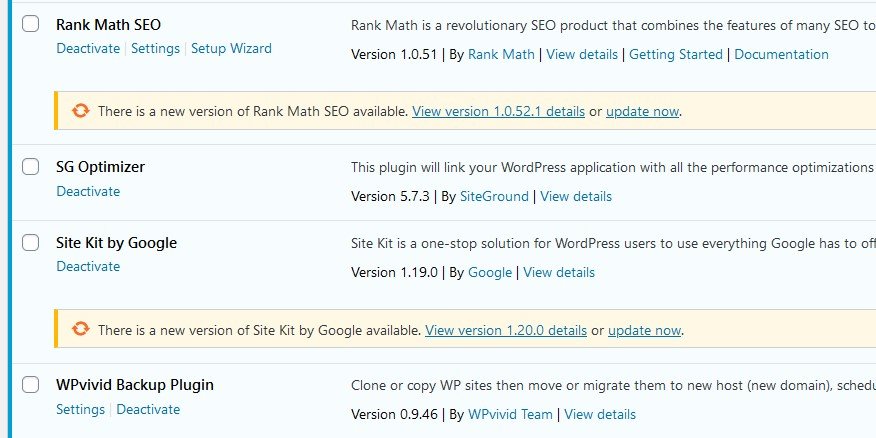
To update your site’s plugins, head to Plugins >> Installed Plugins. Plugins can be updated either manually or in bulk. To update manually, click the “Update Now” message beneath the desired plugin.
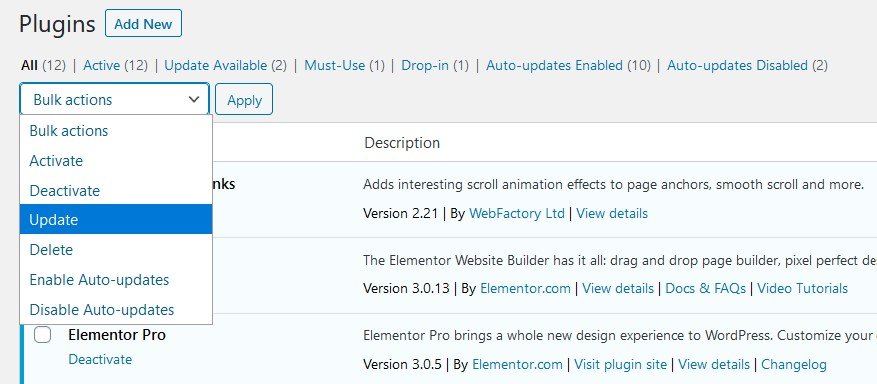
For bulk updates: using the checkboxes next to each plugin, select as many as you would like. Then head to the top of the page where it says “Bulk actions,” and use the drop-down to select “Update.” Clicking the Apply button will apply your changes.
Removing Unused Plugins
My philosophy is always, “The less plugins, the better.” I try to keep my list of plugins short and only keep ones that are necessary. Every plugin, even deactivated ones, add more code to your site; this can reveal security vulnerabilities if the plugin gets compromised. Try going through every plugin, asking yourself, “When was the last time I used this? Will I need this anytime soon?” If you haven’t used a plugin in over a month, or it’s been deactivated for just as long, then it might be time to go. Don’t worry, you can always re-download it later if you find a real use for it.
Updating Themes
To update your themes, head to Appearance >> Themes. You can update each theme individually by clicking on them. Unlike plugins, it’s not very risky to update themes.
Troubleshooting Tip: Keep the default Twenty Sixteen theme (or something similar) for possible troubleshooting later.
Post-Update Checks
After you’ve updated your site, it’s time to see if there were any issues. Depending on what updates you’ve made, there are different ways to check for problems.
Updated WordPress Version
This could cause issues with the admin dashboard. You should go through a few of the settings and open your pagebuilder to check for anything that doesn’t work.
Troubleshooting this is very difficult, so it’s recommended to either seek professional help, or to revert to your previous version for the time being. Future bug fixes can often solve minor problems and edge cases. You can use WP Downgrade to revert to a specific WP version.
Updated Themes
Look at the different pages on your site and see if there are any visual problems. Head to Appearance >> Customizer and make sure that the customizer is working.
To troubleshoot any issues, select the default Twenty Sixteen theme (or similar) and check to see if this fixes the issue. If it does, then there’s a problem with the theme you were using. You could follow the plugin troubleshooting process in the next section and see if it helps. Otherwise, you might have to get in touch with the theme developer and report the issue.
Updated Plugins
Check to see if contact forms, pagebuilders, membership systems, or any other systems aren’t working as intended. Plugin conflicts are a common issue in WordPress. To find the culprit, deactivate each plugin, one at a time, and see which fixes the problem. If the plugin is necesary to your site, you may have to restore your website backup and avoid updating that single plugin.
For more help, you can get in touch with your hosting company’s customer support, your web designer, or the plugin author. Later versions of plugins often fixe edge cases like these, so it’s worth waiting until a newer version comes out before updating again.
Still Having Issues?
If you find any problems that you can’t fix, then it’s time to restore an older backup. For further assistance, you should consider contacting a professional.
Images
What We'll Learn
- Adding new images
- Image settings
- Getting the size just right
Adding new images
To add a new image, look for your editing pane on the left of the screen, then find the ‘Image’ element. You can click and drag to add this element to your page. If you can’t find it, make sure you’re in the element window.
Image Settings
Once you’ve added your image, you’ll notice a few different settings:
- Image size: Adjusts the resolution of the image. Trying using the lowest resolution you can get away with- it will keep the file size small.
- Alignment: Aligns the image either left, center, or right.
- Caption: Adds a caption beneath your image. To insert a line break, type “<br>”.
- Link: Determines what happens when the image is clicked. This can be a lightbox (image opoup) or a custom link.


Image Styling
Styling your image can help to give it more pop.
- Width: Use this to set the width of your image. This is the best way to size your image properly. By default this is in pixels. You can also use percent (i.e. 50% width) or VW if you’re more advanced.
- Max Width: Sets the Max Width. This is a bit harder to work with than Width, though you can get similar results.
- Height: Sets the image height. Just as with Max Width, using the normal Width slider is the preferred way of sizing your image.
- Normal and Hover effects: This can be a great way to make your images pop and animate them a little. “Normal” refers to an image’s default state, while “Hover” is when someone puts their mouse or finger over the image. These effects don’t work too well on mobile devices.
- Opacity: Sets how transparent your image is.
- CSS Filters: A fun little toolbox of different filters to put on your images.
- Transition Duration: Changes the amount of time a hover effect will play for. Applies to opacity and CSS filters.
- Hover Animation: Plays a pre-made animation when someone hovers over your image.

Hover: Opacity=1.0
Transition Duration=0.5
Border Width=5
Border Radius=3
Hover: CSS Filters >> Blur=0
Transition Duration=0.3
Border Radius=25
Adding and Modifying Users
What We'll Learn
- Adding new users
- User roles
- Modifying existing users
Adding a New User
Adding a new user is a very simple process. The first step is to head over to Users >> Add New. From here, you’ll need to add a username, email, first and last name, and lastly a password. Be aware that, once created, usernames cannot be changed. To set a password, you can click “Show Password” and choose to either use a randomly generated one or create your own. If you’re password isn’t considered secure (its length is too short/no numbers or special characters), you’ll need to click the “Confirm use of weak password” option to be able to use it. Now that you’re password’s been created, the last step is to choose a user role. This is discussed more below.
User Roles
There are several roles that a user can have, ranging from admin to subscriber. The following descriptions, adapted from WordPress.org, should help you decide which one you need:
- Administrator – somebody who can download plugins, edit posts and pages, use the theme customizer, and edit and remove users. By default, admins can delete each other’s accounts without warning.
- Editor– somebody who can publish and manage posts including the posts of other users.
- Author – somebody who can publish and manage their own posts.
- Contributor – somebody who can write and manage their own posts but cannot publish them.
- Subscriber – somebody who can only manage their profile.
Modifying Existing Users
If you’re looking to edit your own profile, that can be found under Users >> Your Profile. To edit other users, go to Users >> All Users. Here, you can place your mouse over someone’s username and see the Edit, Delete, and View options. Edit is what we’re looking for. This lets you change a user’s full name, nickname, contact information, password (click Generate Password and then replace it), and much more.
WordPress Plugins
What We'll Learn
Plugins are an essential part of WordPress, since they add extra functionality to your site without the need to write code. With over 15,000 currently available, most of which are free to download, you can find plugins for just about anything. In this article, we’ll be going over when you would want to use plugins, how to install them, and the different kinds you can get.
When You'll Need Plugins
Although Elementor has a treasure trove of features and elements to use, it unfortunately can’t do everything. Let’s say you want to have a subscription feature, where people can pay to view content on your site. Or maybe you want to have a job board system, like on Upwork or Fiverr. On its own, Elementor doesn’t offer this kind of functionality. But there are many plugins available for both of these examples. When considering if you need a plugin, the general rule is to see if Elementor can do something already; if it can’t, or if it doesn’t do it very well, then it may be time to use a plugin.
Downloading Plugins
When managing your plugins, it’s a good idea to have as few as possible, since downloading too many can slow down your site. To download new plugins, you need to head to Plugins >> Add New, where you’ll immediately be greeted with a grid of recommended plugins. To search for something specific, you can use the search bar in the top right of the page. You can also add plugins downloaded from third-party sites, by using the Upload Plugin button in the top left and uploading a .zip file.
Recommended Plugins to Use
With over 50,000 plugins to choose from, it can be difficult to decide on just one. To make things a little easier, we’ve compiled a list of high-quality plugins, spanning any feature you may want. If you need a feature that isn’t listed here, you can always use the search function from the Plugins page.
- RankMath – great SEO plugin that integrates well with Elementor
- Site Kit – connects Google web tools and analytics
- Limit Login Attempts – limits login attempts for people trying to get into your WordPress account
- FileBird Lite – organizes media library into folders
- WPvivid Backup – full website backups, either scheduled or manual
- Complianz | GDPR/CCPA Cookie Consent – creates cookie consent banner and associated legal documents
- Modern Events Calendar Lite – create events and display them on a calendar
- Hummingbird– the easiest way to speed up your website
- Smush – optimizes images to help speed up your site; use with Hummingbird
- SG Optimizer – speeds up websites hosted with SiteGround; this will be in place of W3 Total Cache
- Paid Member Subscriptions – adds a subscription system and private content
- WP Email Users – mass email website users based on their role
- WP Job Manager – creates a job board system, like Fiverr or Upwork
- Constant Contact Forms – since Elementor Pro doesn’t offer Constant Contact integrations, you’ll have to use this for CTCT
- Profile Builder – creates more in-depth user profiles
- Velvet Blues – updates URLs when moving domains
- Auto-Renew SSL – sets up an auto-renewing SSL with Let’s Encrypt